

How to use Continuity Camera on Mac and iPhone? The Continuity Camera on Mac allows users to take photos, scan files, and draw doodles on their iPhones and save them to their Mac. You can even utilise the iPhone as a webcam to compensate for the MacBook and iMac’s weak cameras. I appreciate how easy it is to use your iPhone to take images or scan papers to share them on the road. Continue reading to learn how to perform all of these tasks and master the Continuity Camera feature on Mac.
Table of Contents
How to use your iPhone as a Mac webcam?
The cameras on the MacBooks and iMacs are nothing special, and the video quality is only average. On the contrary, the iPhone has a fantastic set of cameras. Apple has launched a new feature in Continuity Camera that allows you to use your iPhone as a webcam to fully leverage the hardware capabilities of the iPhones.
This capability was included in Apple’s most recent software releases, wiz., iOS 16, and macOS Ventura. It is a tiny tweak that can make a significant difference in day-to-day usage. Continue reading to learn about the requirements, supported apps, and all you can do with your iPhone’s camera as a webcam.
Requirements to use an iPhone as a webcam in macOS Ventura
- A Mac device that has been updated to macOS Ventura.
- An iPhone running iOS 16 (iPhone 8 and above).
- The same Apple ID should be used to log in to both the Mac and the iPhone.
- Both devices should have Bluetooth and Wi-Fi activated.
- Desk View and Centre Stage are only available on iPhone 11 and later.
- The Studio Light function is only available on iPhones 12 and higher.
Requirements to use Continuity Camera
- Devices should be placed close to one another.
- Wi-Fi should be enabled on both the Mac and the iPhone or iPad, and Bluetooth should be enabled.
- Both devices must use the same Apple ID and have two-factor authentication enabled.
- A Mac running macOS Mojave or above.
- An iPhone or iPad running iOS 12 or later, or iPadOS 12 or later.
How to use Continuity Camera on Mac and iPhone?
Here is the list of 2 methods to use Continuity Camera on Mac and iPhone:
Method #1. Use Continuity Camera on iPhone
While the Continuity Camera is enabled by default in iOS 16, it is best to double-check the setting to ensure a flawless experience.
- Navigate to the Settings app on your iPhone.
- AirPlay & Handoff in General
- Toggle on Continuity Camera here.
Your iPhone is now ready to serve as a webcam for your Mac. It can record both video and audio. As a result of the microphones on your iPhone, you get an enhancement in video quality as well as improved audio input.
Only the rear camera, however, can be used as a webcam. Also, keep your iPhone close to your Mac so that it can communicate with it.
You may now use the Continuity Camera functionality within Mac programmes or video calling/conferencing websites. Both approaches provide step-by-step instructions.
Method #2. Use Continuity Camera on Mac
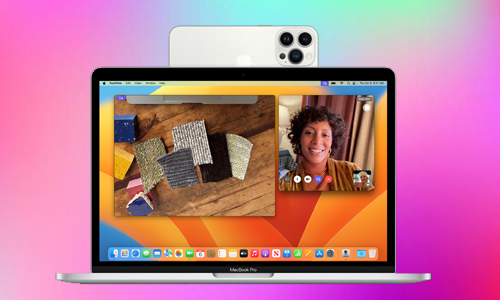
You may utilise Continuity Camera with any Mac programme that supports video calling, like as FaceTime, Zoom, or Skype.
FaceTime was provided as an example. There is a potential that the precise titles in the Menu Bar will differ, but the steps below should give you a good idea of how to go about enabling Continuity Camera.
- Launch FaceTime (or another app of your choosing) on your Mac. Check that the iPhone and Mac are both connected to Wi-Fi and Bluetooth.
- In the Menu Bar, select the Video tab. The title may alter depending on the app you’re using.
- Choose your iPhone from the listed devices (As in “iPhone 13 Pro Max Camera”)
- Your iPhone can now be used as a webcam.
The photographs above show the difference in image quality between Mac’s 720p camera and the iPhone’s camera.
How to manage video effects in a Continuity Camera?
- Launch Control Centre on your Mac.
- Navigate to the Video Effects tab. This tab appears only when you use the Continuity Camera feature.
- Choose between Center Stage, Portrait, and Studio Light.
- To use the function, select Desk View.
If you have an iMac or a MacBook, you can utilise the Continuity Camera function to improve the video quality of video chats, conferences, and so on. However, it is particularly beneficial for users who use a Mac mini, Mac Studio, or other Mac devices that lack a built-in camera.
Have you ever used the Continuity Camera? And, if you have, what are your impressions on the video quality and general programme implementation? Please share your ideas in the comments section below.

