

How to use multi-stop routing in Apple Maps on iPhone, iPad, and Mac? Apple intends to make its Maps app as reliable as, if not better than, its competitors. As you may have noticed, the navigation and overall UI have been improved as a result of the improvements. Apple unveiled the long-awaited update to the Maps app during WWDC 2022: the ability to add multiple stops on a route.
Because this new functionality is only available for iOS 16, iPadOS 16, and macOS 13, you may be confused about how to design a route on Apple Maps with several stops. No need to worry, because that is exactly what I will demonstrate here.
How to use multi-stop routing in Apple Maps on iPhone, iPad, and Mac?
Here is the list of 2 methods to use multi-stop routing in Apple Maps on iPhone, iPad, and Mac:
Method #1. By using iOS 16 and iPadOS 16
Despite the fact that they are distinct operating systems, the methods for creating a route on Apple Maps with several stops for iOS and iPadOS are the same. You only need to complete the following:
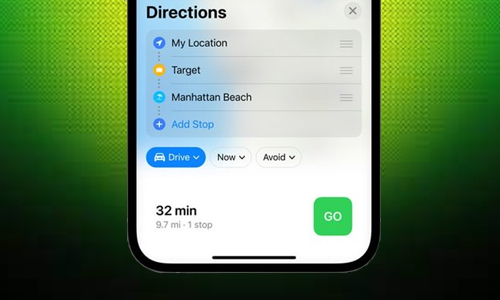
- Launch Apple Maps.
- Look for your destination.
- Select Directions.
- Then, select Add Stop.
- Choose the location you wish to add in between.
After you start the navigation, you can even add numerous stops. Because of this:
- Tap the tiny arrow in the lower right corner.
- Now, select Add Stop.
- Find the location and tap Add Stop.
Method #2. By using macOS Ventura
- Open Apple Maps on your Mac and look for your final destination.
- Choose the location from the search results.
- Select either Direction or Create Route.
- Now, click the Add Stop button.
- Search for and pick the location you wish to add.
- Rep to the previous step to add more stops.
- Then, go with Now or Plan Later.
After you’ve configured the directions, you may send them from your Mac to your iPhone or anyone else you wish. To share an Apple Maps route, click the Share button and then choose who and how to share it with.

